
 EN
EN  BG
BG
New ELRS Nano TX V2 module from BETAFPV with T-LED antenna indicator
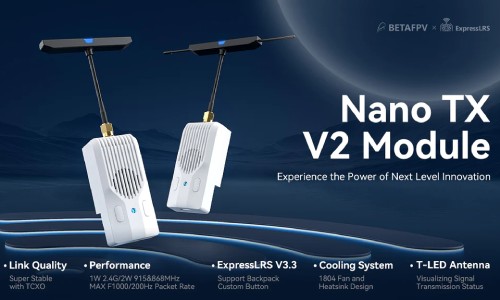 BETAFPV has announced the sale of a new module with ELRS, the Nano TX V2 is packed with upgrades for an unrivaled piloting experience. Featuring an innovative T-LED antenna with its own flickering frequency, indicating signal transmission and module connection status. With up to 1W/2W power, it provides stable connections for FPV racing, long-distance flights and professional photography. Seamless integration with Backpack and button customization. The fan-cooled 1804 has also been added to the device.
Main features:
- The first ever T-LED antenna with built-in LED display functionality, allowing pilots to effortlessly monitor signal transmission and reception while using the radio.
- It offers 3 versions: 2.4GHz with a maximum output power of 1W and 915/868MHz with a maximum output power of 2W. The maximum packet rate is F1000/200Hz.
Featuring an integrated TCXO, it minimizes frequency deviation for stable operation, eliminating signal interference. - With its optimized internal airflow channel and heatsink, high-speed cooling fan 1804, it effectively dissipates heat even at high power, ensuring stable connection performance.
- Backpack support and custom button functions based on ELRS V3.3, enabling pilots to connect external devices and assign buttons according to their personal usage habits.
Technical specification:
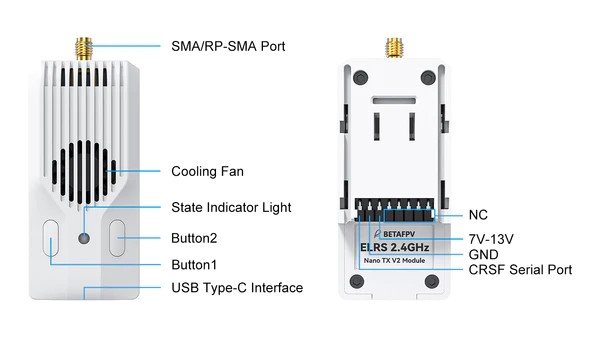
- Item: BETAFPV Nano TX V2 Module | ELRS 2.4GHz/915MHz/868MHz
- Weight: 28g
- Color: White
- Antenna Connector: RP-SMA(2.4GHz), SMA(915/868MHz)
- RF Power(2.4GHz): 25mW/50mW/100mW/250mW/500mW/1000mW
- RF Power(915/868MHz): 10mW/25mW/50mW/100mW/250mW/500mW/1000mW/2000mW
- Packet Rate(2.4GHz): 50Hz/100Hz/150Hz/250Hz/333Hz/500Hz/D250/D500/F500/F1000
- Packet Rate(915/868MHz): 25Hz/50Hz/100Hz/100Hz Full/200Hz/D50
- Frequency Band: 2.4GHz ISM, 915MHz FCC, 868MHz EU
- Backpack: Support
- Input Voltage: 7V~13V DC
- Power Consumption(2.4GHz): 8V,1000mA@1000mW, 150Hz,1:128
- Power Consumption(915/868MHz): 8V,1000mA@1000mW, 50Hz,1:128
- USB Port: Type-C
- Fan Voltage: 5V
- Default Firmware Version: ExpressLRS V3.3.0
Diagram of the Nano TX V2 module
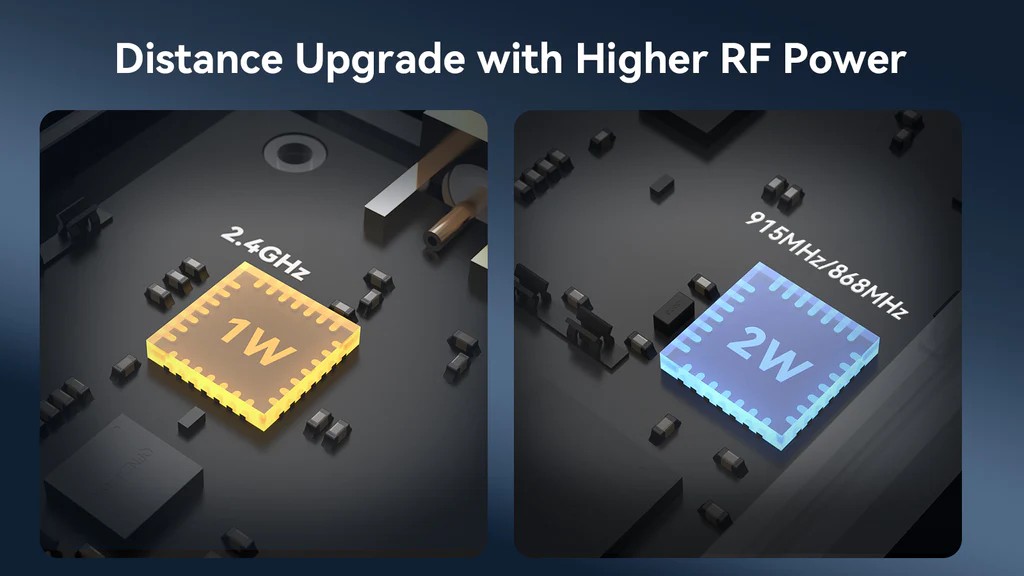
1W&2W Output Power
The Nano TX V2 module also offers 3 versions: 2.4 GHz with a maximum output power of 1W and 915/868MHz with a maximum output power of 2W. Featuring an integrated TCXO, it minimizes frequency deviation for stable operation, eliminating signal interference. Enjoy stronger signals, longer transmission distances and extended radio transmitter range. With these options, pilots can explore and connect with greater freedom in wireless communication.
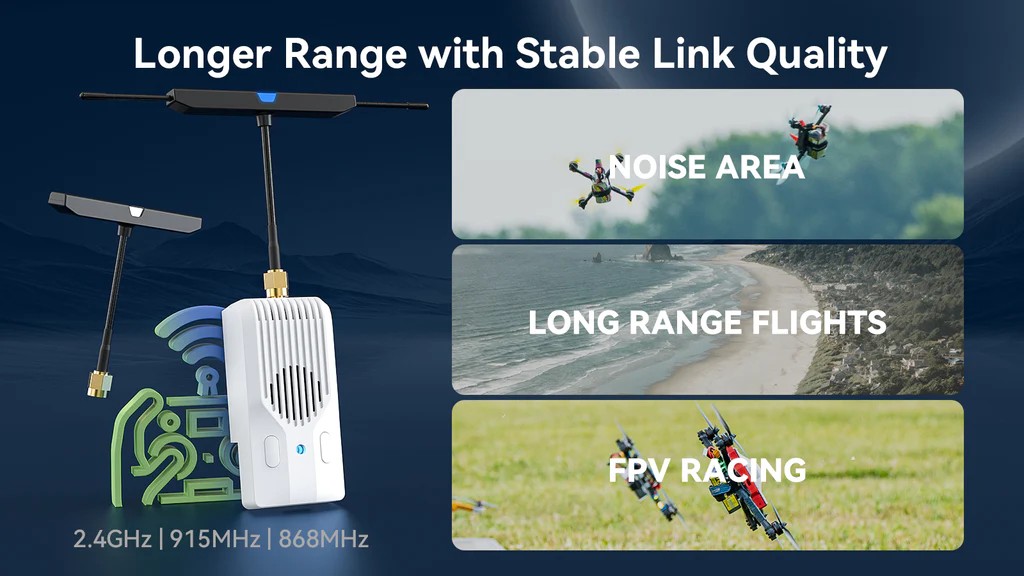
Longer range with stable connection quality
The Nano TX V2 module has a built-in TCXO (temperature compensated crystal oscillator). With the high-quality TCXO, it can withstand extreme temperatures without fear of heat and cold, continuously outputting accurate frequency for long-distance flight. providing a super stable yet strong radio connection for pilots to fly in any environment that requires extremely stable signals and low latency, including long-distance flights, multiplayer flights and FPV competitions. It gives pilots a stable and aggressive flight experience.
T-LED antenna
The T-LED antenna innovatively integrates the LED with the antenna, allowing information to be displayed directly on the antenna. When the antenna is successfully connected, regular flickering indicates the status of signal transmission and reception. A light on represents signal transmission, while a light off represents signal reception. The flicker rate varies depending on the telemetry ratio and packet rate, offering pilots a unique visual experience.
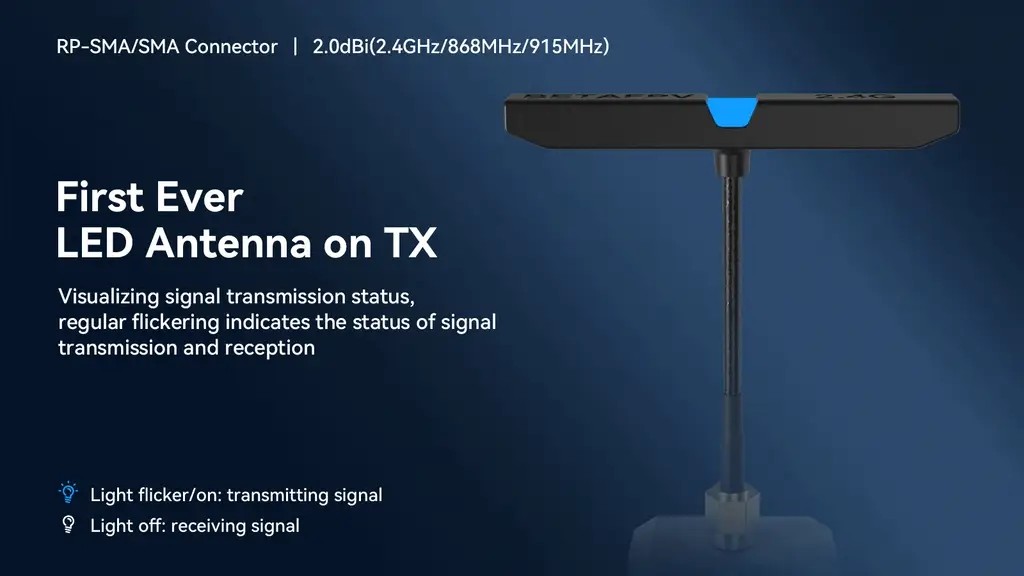
In addition, it detects the connection status between the antenna and the TX module, preventing damage caused by improper use. Irregular flashing of the light while swinging the antenna indicates antenna failure, while irregular flashing while rotating the antenna connector indicates a loose connection in either the antenna or the TX module, requiring replacement.
Note: This T-LED antenna only lights up on the Nano TX V2 module. Other antennas such as Moxon and Loop can also be used directly on the Nano TX V2 module (915/868MHz version), but the 2.4GHz version requires an RP-SMA to SMA adapter.
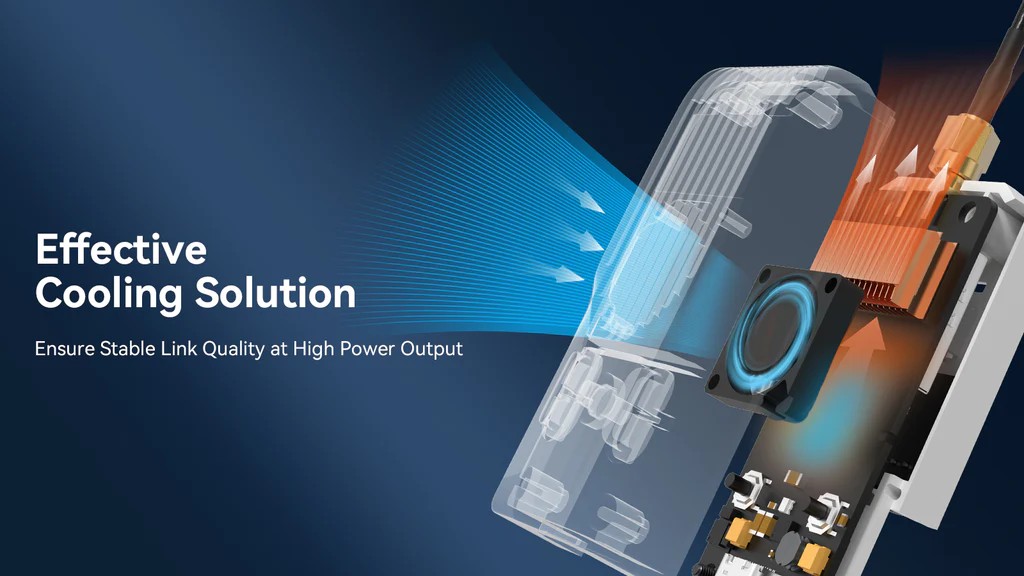
Cooling system
The Nano TX V2 features a fully injection molded shell with excellent texture. With its optimized internal airflow channel and heatsink, high-speed cooling fan 1804, it effectively dissipates heat even at high power, ensuring stable connection performance. Pilots can fly with confidence and enjoy reliable performance thanks to this double-checked cooling solution.
Backpack with rich customization
Backpack, developed by the ExpressLRS team, is an add-on module designed for radio transmitters. Providing enhanced flexibility and scalability, enabling pilots to connect external devices such as goggles, the Nano TX V2 module offers a highly adaptable and expandable solution for a variety of application scenarios and pilot functional needs. There are two buttons reserved for pilots to customize their functions, allowing pilots to assign buttons according to their personal usage habits.

Combination with most TX radios
The Nano TX V2 module can be configured via a LUA script. EdgeTX V2.8.0 and OpenTX radio transmitter that supports CRSF can be used easily. Available for popular Nano port TX like BETAFPV LiteRadio 3 Pro, Radiomaster Zorro/Pocket, Jumper T Pro V2/T20, TBS Tango 2 etc., and Radiomaster TX16, Boxer and Jumper T16/T20, Frsky QX7, X9 when using with micro-nano modular adapter.
Basic configuration
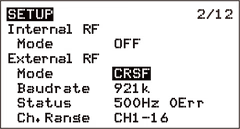
In the EdgeTX system, select "MODEL SEL" and enter the "SETUP" interface. In this interface, turn off Internal RF (set to "OFF"), turn on External RF, and set the output mode to CRSF. Connect the module correctly and then the module will function properly. The settings are shown below.
Lua is a lightweight and compact scripting language. It can be used by embedding into radio transmitters and easily reading and modifying the modules parameter set. The instructions for using Lua are as below.
- Download elrsV3.lua from official BETAFPV website or ExpressLRS configurator
- Save the elrsV3.lua files to the radio transmitter SD card in the Scripts/Tools folder
- Press the "SYS" button or the "Menu" button on the EdgeTX system to access the "Tools" interface, where you can select "ExpressLRS" and run it
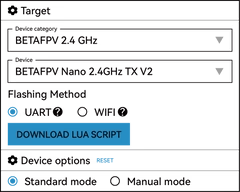
- The images below show the Lua script if it runs successfully
Custom buttons
There are two buttons reserved for users to customize its features. The steps of the operation are shown below.
- Enter WiFi mode by activating the module or turning it on for 60 seconds
- After the RGB status indicator starts flashing green slowly, the receiver's WiFi will be enabled (WiFi name: ExpressLRS TX, password: expresslrs
- Connect your phone or computer to WiFi and enter the browser at http://10.0.0.1. You will be able to find the custom button settings page
- In the "Action" column, select the desired custom function; In the "Press" and "Count" columns, select the type of button press and the number of presses or the duration of the press
- Click "Save" to complete the configuration
There are six shortcut buttons and two ways to use the buttons: long press and short press. A long press can be set to a custom duration, while a short press can be set to a custom number of presses. Below are six functions that can be set.
| Unused | Send VTX Settings |
| Increase Power Output | Enable WiFi |
| Enter VTX Channel Menu | Enter Binding Mode |
| Enter VTX Frequency Menu |
The module's default functions are shown below.
| Button | Action | Press | Count |
| Button1 (Left Button) |
Enter Binding Mode | Short Press | 3 Times |
| Increase Power | Long Press | For 0.5 seconds | |
| Button2 (Right Button) |
Go to VTX Channel Menu |
Short Press | 2 Times |
| Send VTX Settings | Long Press | For 0.5 seconds |
Note: This transmitter hardware does not support RGB button lights.
Connection and external power supply
The default firmware of the Nano TX V2 module is ExpressLRS version 3.3.0. There is no pre-set binding phrase. Binding to transmitters must therefore ensure that the receiver uses V3.0.0 above without a bind phrase.
- Put the receiver in connection mode and wait for the connection.
- Quickly press button 1 (left button) three times to enter bind mode (factory default), or you can enter bind mode by clicking "Bind" in the Lua script. if the indicator light is steady, it indicates that the device is connected successfully.
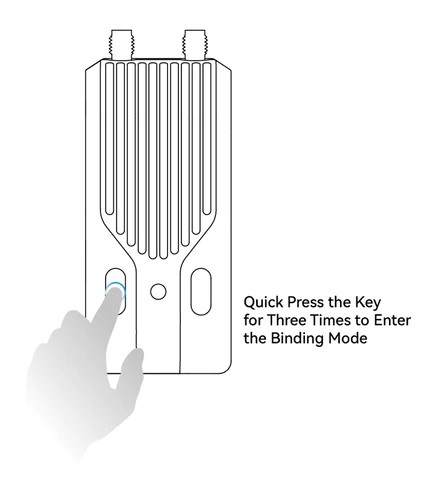
Note: If the transmitter module has been overwritten with a bind phrase, then using the above binding method will not bind to other devices. Please set the same bind phrase for the receiver to perform automatic binding.
The power consumption of the Nano TX V2 module when using a transmission power of 500mW or more is relatively high, which will shorten the time of using the remote control. Users can provide power to the module by using an XT30-USB adapter cable to connect to an external battery. The method of use is shown in the following figure.
- The power consumption of the transmitter is not only related to the transmission power, but also to the telemetry ratio. When using high power of 500mW and above, the return factor can be set higher to reduce power consumption and extend usage time.
- For example, in Gemini mode, the power consumption when setting the flyback ratio to 1:128 is 1000mA, while the power consumption when setting the flyback ratio to 1:2 is only half of 1:128.
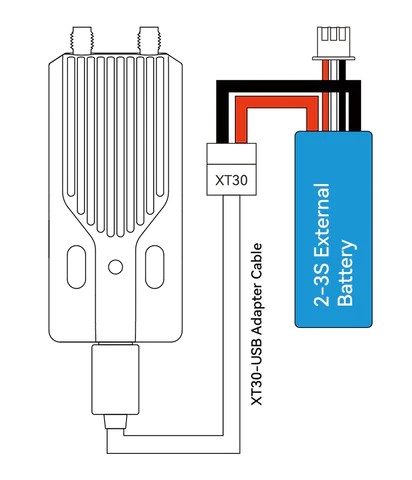
Note: When the battery voltage of the remote control or external battery is lower than 7V (2S) or 10.5V (3S), please do not use 500mW and 1W, otherwise the module will restart due to insufficient power, which will resulted in disconnection and loss of control.
FREQUENTLY ASKED QUESTIONS
- Unable to enter LUA script, possible reasons are as follows:
- The TX module is not well connected to the remote control, you need to check if the Nano pin of the remote control and the socket of the TX module are in good contact
- The version of the ELRS LUA script is too low and should be upgraded to elrsV3.lua
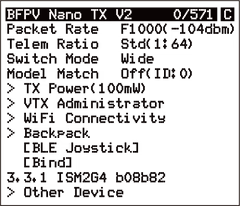
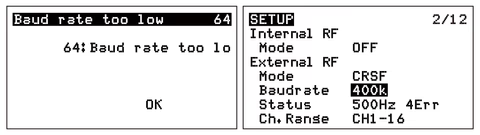
If the baud rate of the remote control is too low, set it to 400K or more (if there is no option to set the baud rate of the remote control, you need to upgrade the firmware of the remote control, e.g. EdgeTX needs to be V2.8.0 or on Nova TV) - Target Name: BETAFPV Nano V2 2.4GHz/915MHz/868MHz TX

- Packet rate cannot be set to F1000 or "Baud rate too low" prompt.
- Cause: The problem is caused by the baud rate of the remote control being too low because the F1000 packet rate needs to support a rate above 400K to work
- Solution: First you need to update the baud rate setting (more than 400K is good) in the model setting menu or system menu->Hardware and then restart the remote control to make sure the baud rate setting is applied
- The packets between the remote control and the TX module are less than 1000 while the F1000 packet rate is on.
- Cause: This issue is caused by synchronization issues with the EdgeTX remote control system
- Solution: Upgrade the EdgeTX version of the remote control to 2.8.0 or later

- Download instructions for the Nano TX V2 Module
- Download firmware for Nano TX V2 Module
- Download Backpack firmware for Nano TX V2 Module
- Find more information about ELRS Lua Scripts
Package includes:
- 1 * Nano TX V2 Module
- 1 * T-LED Antenna
- 1 * USB to Type-C Data Cable
- 1 * Type-C Male to XT30U Male Power Cable
- 1 * Instruction Manual
- 1 * Service Card